# 12-整合MinIO
# 1.MinIO简介
![]()
# 官网
官网地址:https://min.io/ (opens new window)
项目地址:https://github.com/minio/minio (opens new window)
快速入门:https://docs.min.io/docs/minio-quickstart-guide.html (opens new window)
# 什么是MinIO
MinIO 是一个高性能、兼容 S3 协议的对象存储服务,采用 GNU AGPL v3 开源协议。
MinIO is a High Performance Object Storage released under GNU Affero General Public License v3.0. It is API compatible with Amazon S3 cloud storage service. Use MinIO to build high performance infrastructure for machine learning, analytics and application data workloads. ----官网定义
它适合存储海量的非结构化的数据,例如说图片、音频、视频等常见文件,备份数据、容器、虚拟机镜像等等,小到 1 KB,大到 5 TB 都可以支持。
国内阿里巴巴、腾讯、百度、华为、中国移动、中国联通等企业在使用 MinIO,甚至不少商业公司二次开发 MinIO 来提供商业化的云存储产品。
# 为什么选择MinIO
以前使用阿里的OSS,方便是方便,但是费用是真的贵。
后来使用FastDFS,一方面部署运维复杂、无官方文档、缺乏长期维护的团队、性能较差。另一方面,FastDFS并未提供 Docker & Kubernetes 集成方案。基于这些原因,在友好度上,并不友善,不过这一块仁者见仁智者见智,不做参考,各位看官按照自己喜欢的就行。
Minio是支持docker安装的,非常方便,小编现在的私人服务器上,就是用的docker安装方式,支持多租户,高可用用集群多节点来做,这个在官网文档中都有详细说明,请自行查阅。
本文,将带你使用 MinIO 来自建一个文件存储服务,并在 Spring Boot 项目中上传图片到 MinIO 中。
# 2. MinIO Server 安装
MinIO 的安装部署还是非常简单的,在官方文档 https://min.io/download (opens new window) 中,罗列了 Windows、Linux、MacOS、Docker、Kubernetes、Source 六种安装方式,你可以根据实际情况,自行选择适合的安装方式。
MinIO的基础概念:
Object: 存储到MinIO的基本对象,如文件、字节流...
Bucket: 用来存储Object的逻辑空间。每个Bucket之间的数据是相互隔离的。
Drive: 部署MinIO时设置的磁盘,MinIO中所有的对象数据都会存储到Drive。
Set: 一组Drive的集合,MinIO会自动根据Drive数量,将若干个Drive划分为多个Set(For example: {1...64} is divided into 4 sets each of size 16)。
# 2.1 快速安装
单机部署
(1) 非纠删码模式部署:此模式下,对于每一份对象数据,minIO直接在data下面存储这份数据,不会建立副本,也不会启用纠删码机制。因此,这种模式无论是服务实例还是磁盘都是”单点“,无任何高可用保障,磁盘损坏就表示数据丢失。
(2) 纠删码模式部署:此模式为MinIO server实例传入多个本地磁盘参数。一旦遇到多于一个磁盘参数,minio server 会自动启用纠删码模式。纠删码对磁盘的个数是有要求的,如不满足要求,实例启动失败。
我们这里也都是按单机部署的方式来安装的。
# 2.1.1 Windows
需要在 Windows PowerShell 中执行。
PS> Invoke-WebRequest -Uri "https://dl.min.io/server/minio/release/windows-amd64/minio.exe" -OutFile "C:\minio.exe" ## 国外资源,龟速下载
PS> setx MINIO_ROOT_USER admin
PS> setx MINIO_ROOT_PASSWORD password
PS> C:\minio.exe server F:\Data --console-address ":9001" ## F:\Data 存储目录;--console-address 是 UI 界面的端口
2
3
4
# 2.1.2 Linux
wget https://dl.min.io/server/minio/release/linux-amd64/minio ## 国外资源,龟速下载
chmod +x minio
MINIO_ROOT_USER=admin MINIO_ROOT_PASSWORD=password ./minio server /mnt/data --console-address ":9001" ## /mnt/data 存储目录;--console-address 是 UI 界面的端口
2
3
# 2.1.3 MacOS
curl --progress-bar -O https://dl.min.io/server/minio/release/darwin-amd64/minio ## 国外资源,龟速下载
chmod +x minio
MINIO_ROOT_USER=admin MINIO_ROOT_PASSWORD=password ./minio server /mnt/data --console-address ":9001" ## /mnt/data 存储目录;--console-address 是 UI 界面的端口
2
3
# 2.1.4 Docker
① Podman安装(官网推荐):
podman run -p 9000:9000 -p 9001:9001 minio/minio server /data --console-address ":9001"
② Docker安装:
docker run -p 9000:9000 -p 9001:9001 -e "MINIO_ACCESS_KEY=admin" -e "MINIO_SECRET_KEY=password" minio/minio server /data --console-address ":9001" ## /data 存储目录;--console-address 是 UI 界面的端口
# 2.1.5 Docker Compose
version: "3"
services:
  minio:
    restart: always # 指定容器退出后的重启策略为始终重启
    image: minio/minio:RELEASE.2021-06-17T00-10-46Z
    container_name: minio
    ports:                  # 映射端口
      - "9000:9000"
    volumes:                # 数据卷挂载路径设置,将本机目录映射到容器目录
      - ./minio/data:/data
      - ./minio/config:/root/.minio
    environment:            # 设置环境变量,相当于docker run命令中的-e
      TZ: Asia/Shanghai
      MINIO_ACCESS_KEY: minio
      MINIO_SECRET_KEY: minio123
    command: server /data
2
3
4
5
6
7
8
9
10
11
12
13
14
15
16
# 2.2 访问 UI 界面
使用浏览器访问 http://127.0.0.1:9000 地址,访问 MinIO 内置的 UI 界面。
输入账号 admin,密码 password 进行登录,成功进入首页。
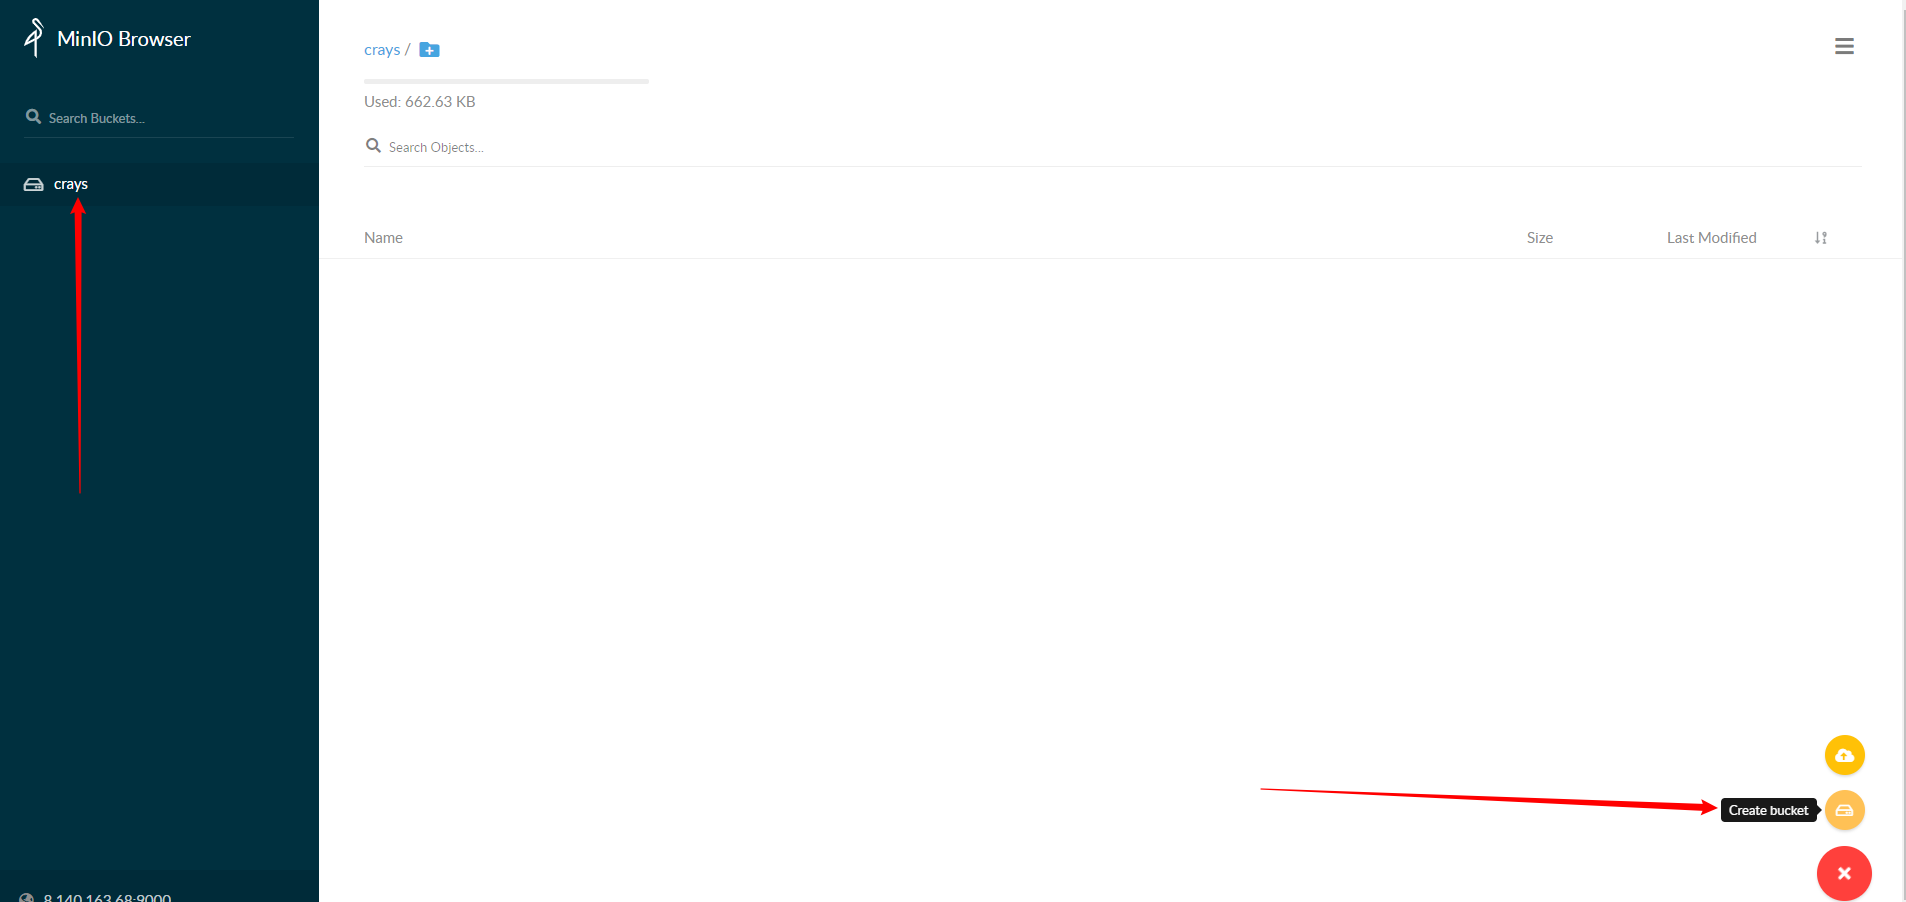
# 2.3 新建存储桶
点击 [Create Bucket] 按钮,新建一个 Bucket 存储桶,用于稍后文件的上传。
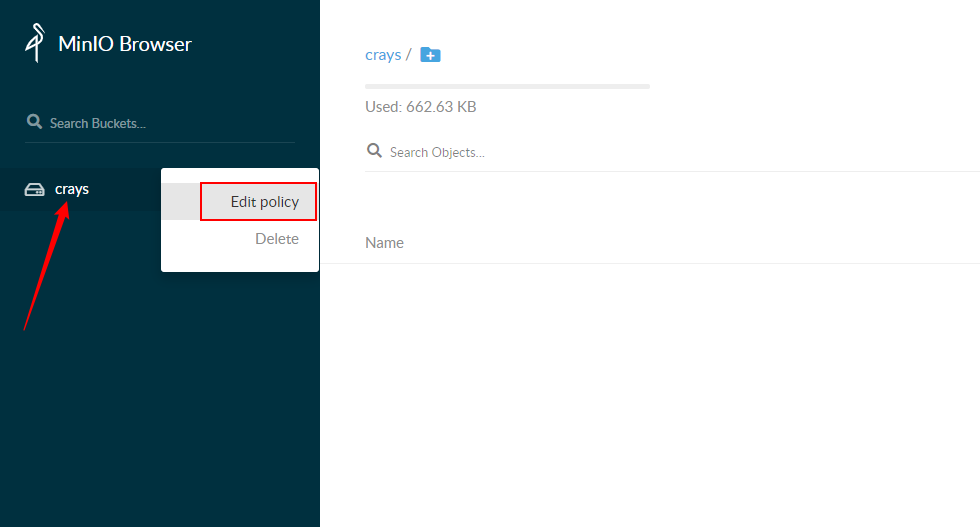
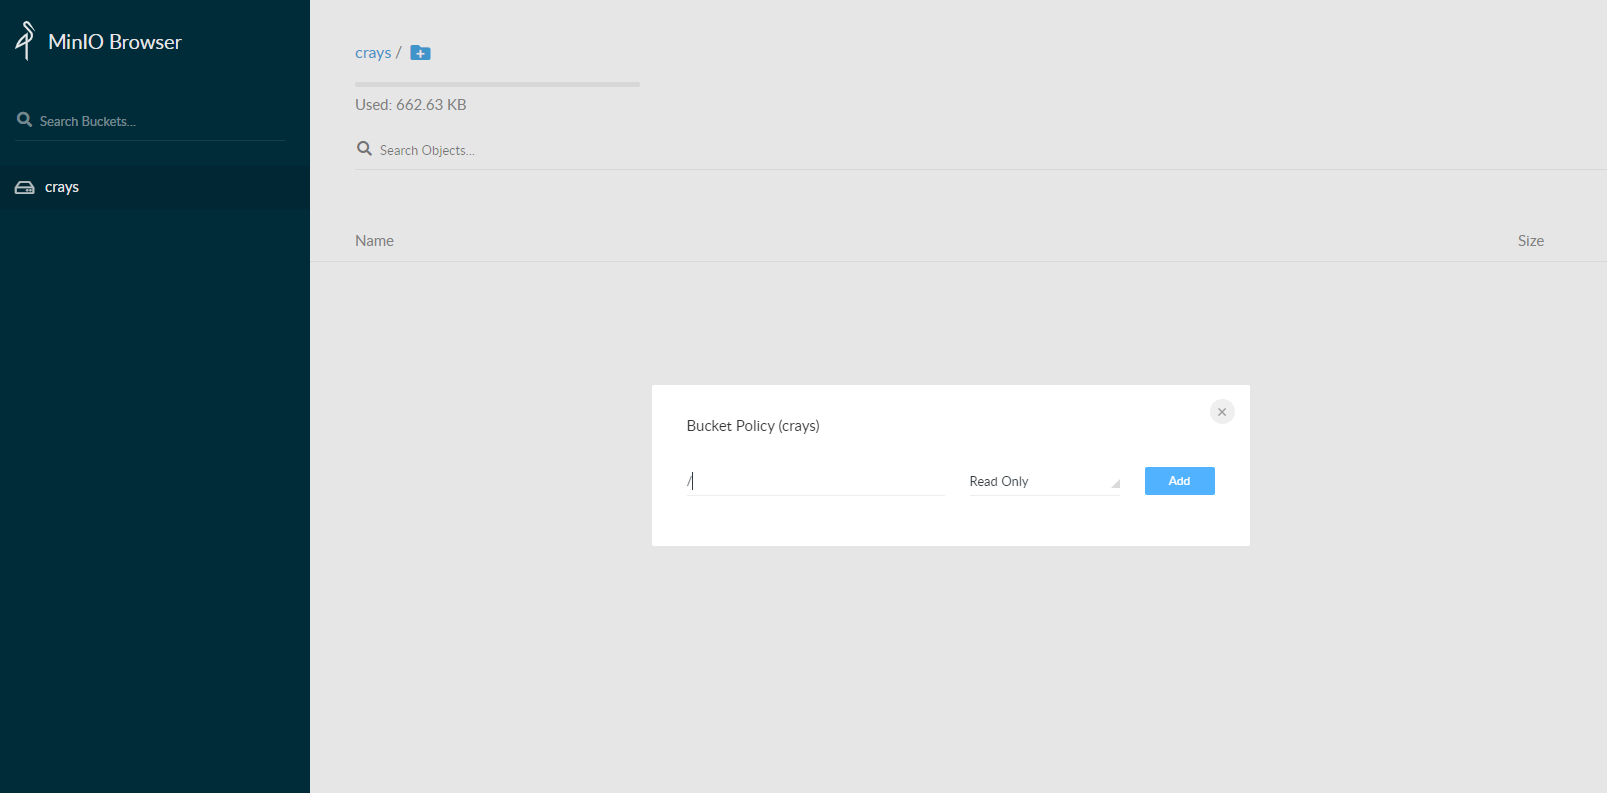
# 2.4 添加 readonly 访问规则
默认配置下,访问存储桶是需要请求授权的。但是在实际场景下,我们往往希望允许直接访问,此时就需要添加一条 readonly 访问规则。
① 点击刚才创建的存储桶 crays 右侧的点号,然后选择 [Edit policy] 菜单。
② 添加一条 Prefix 为 / Access 为 Read Only 的规则。
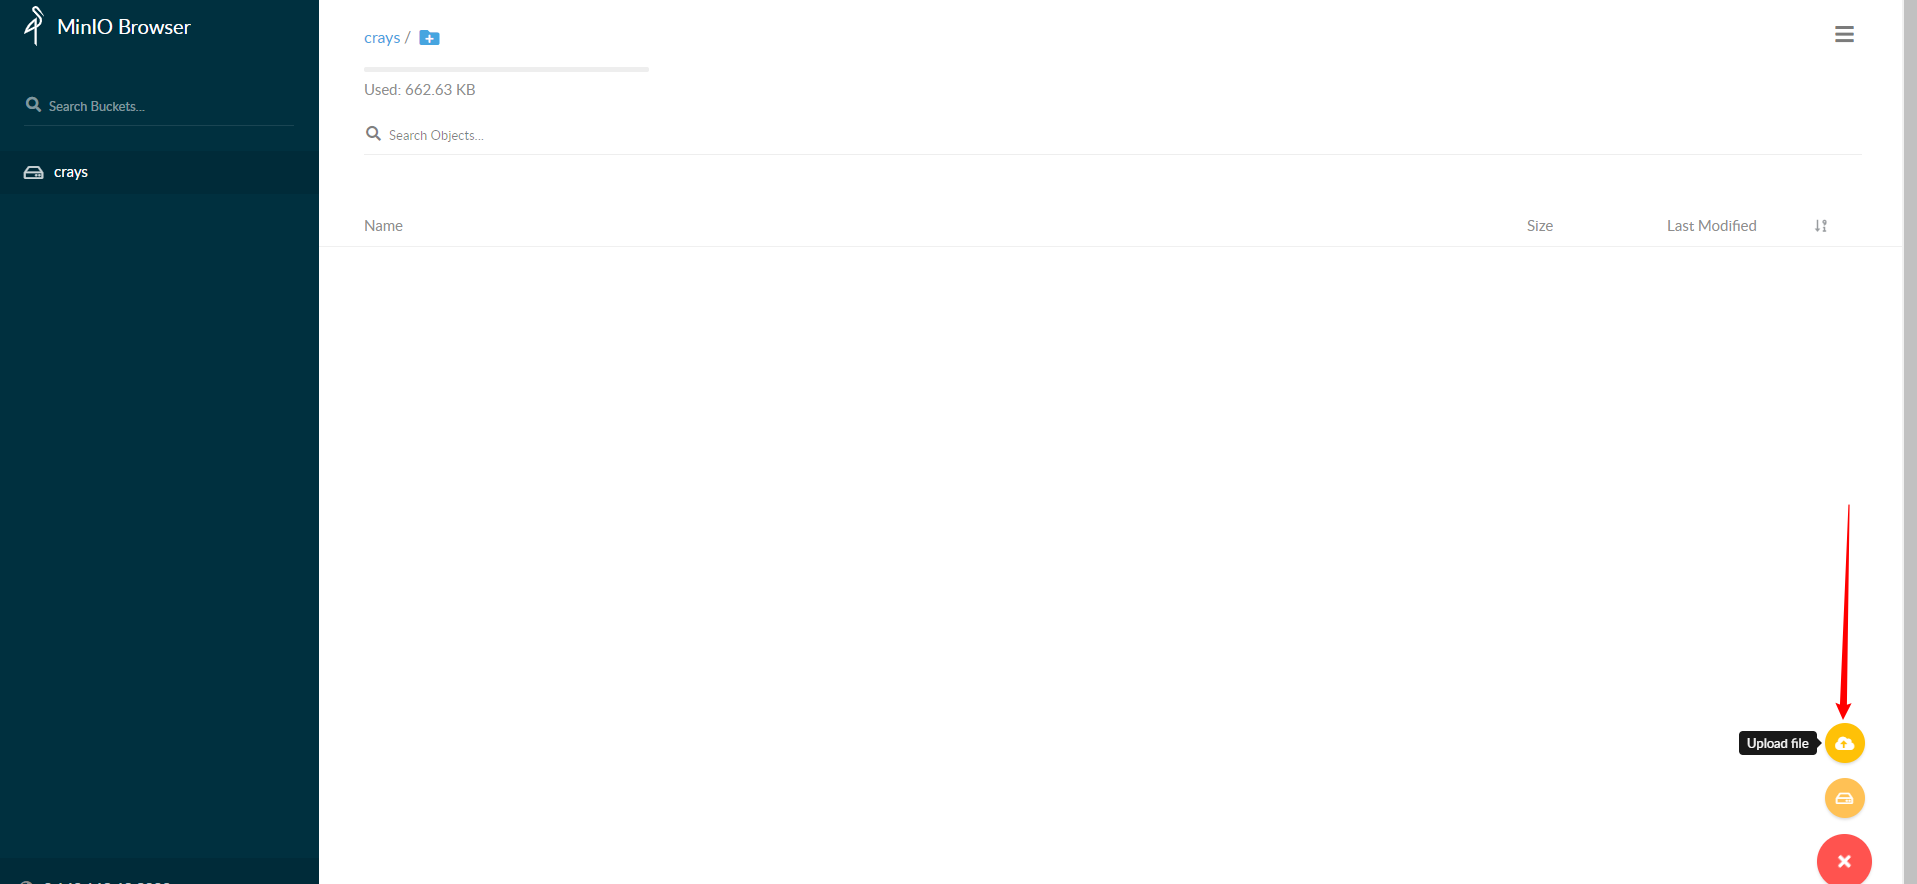
# 2.5 上传文件
点击页面右下角的加号按钮,点击 [Upload File] 选项,选择一个图片上传。
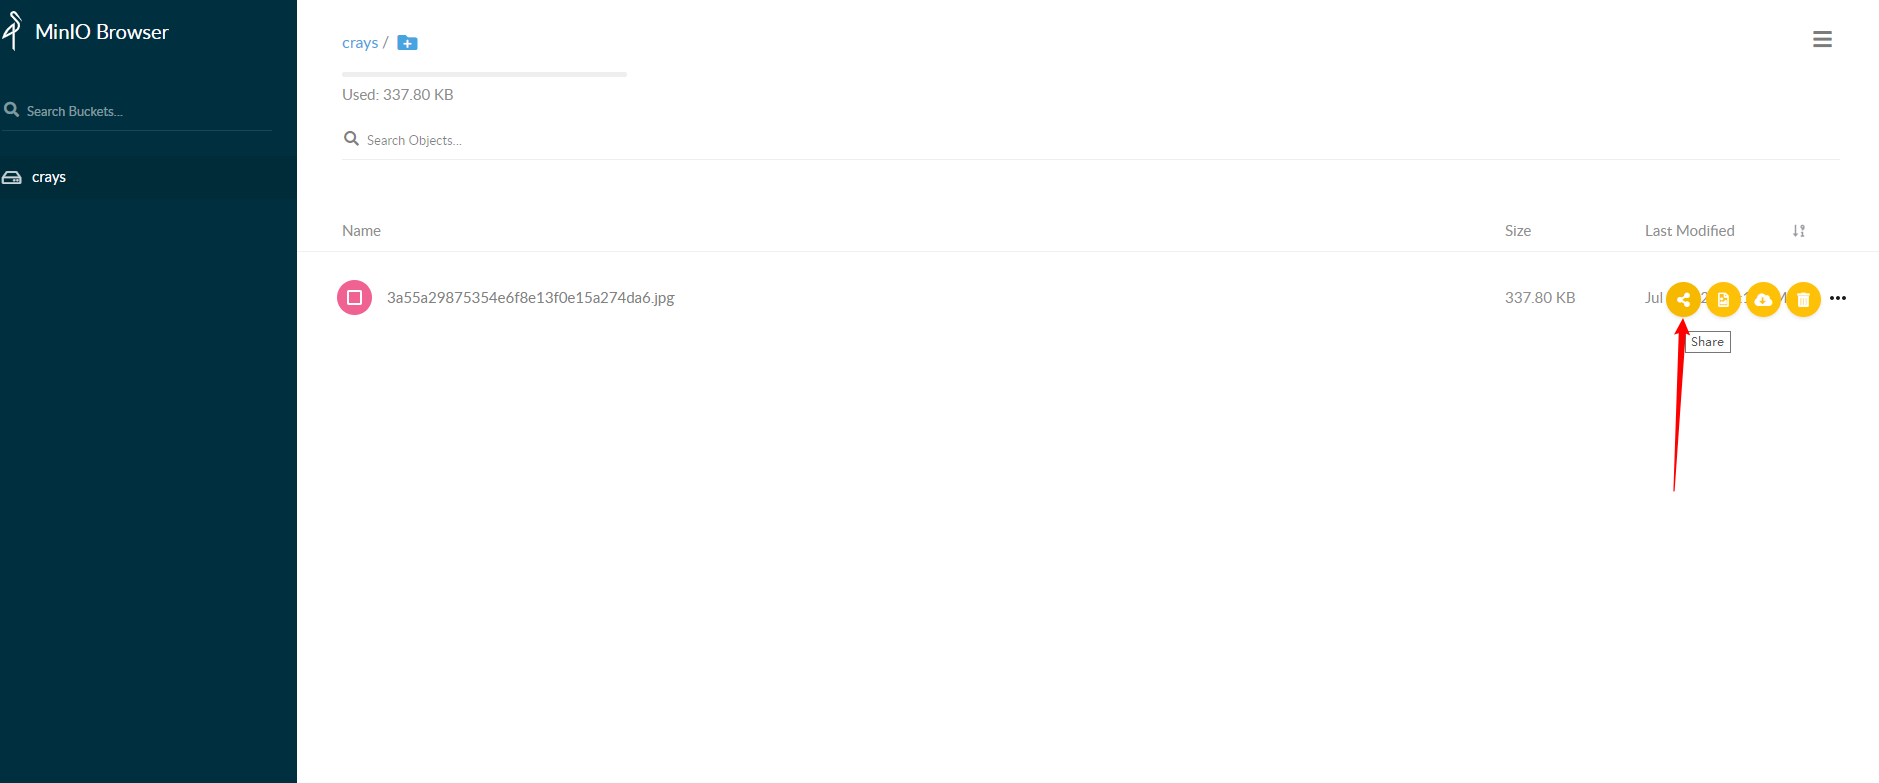
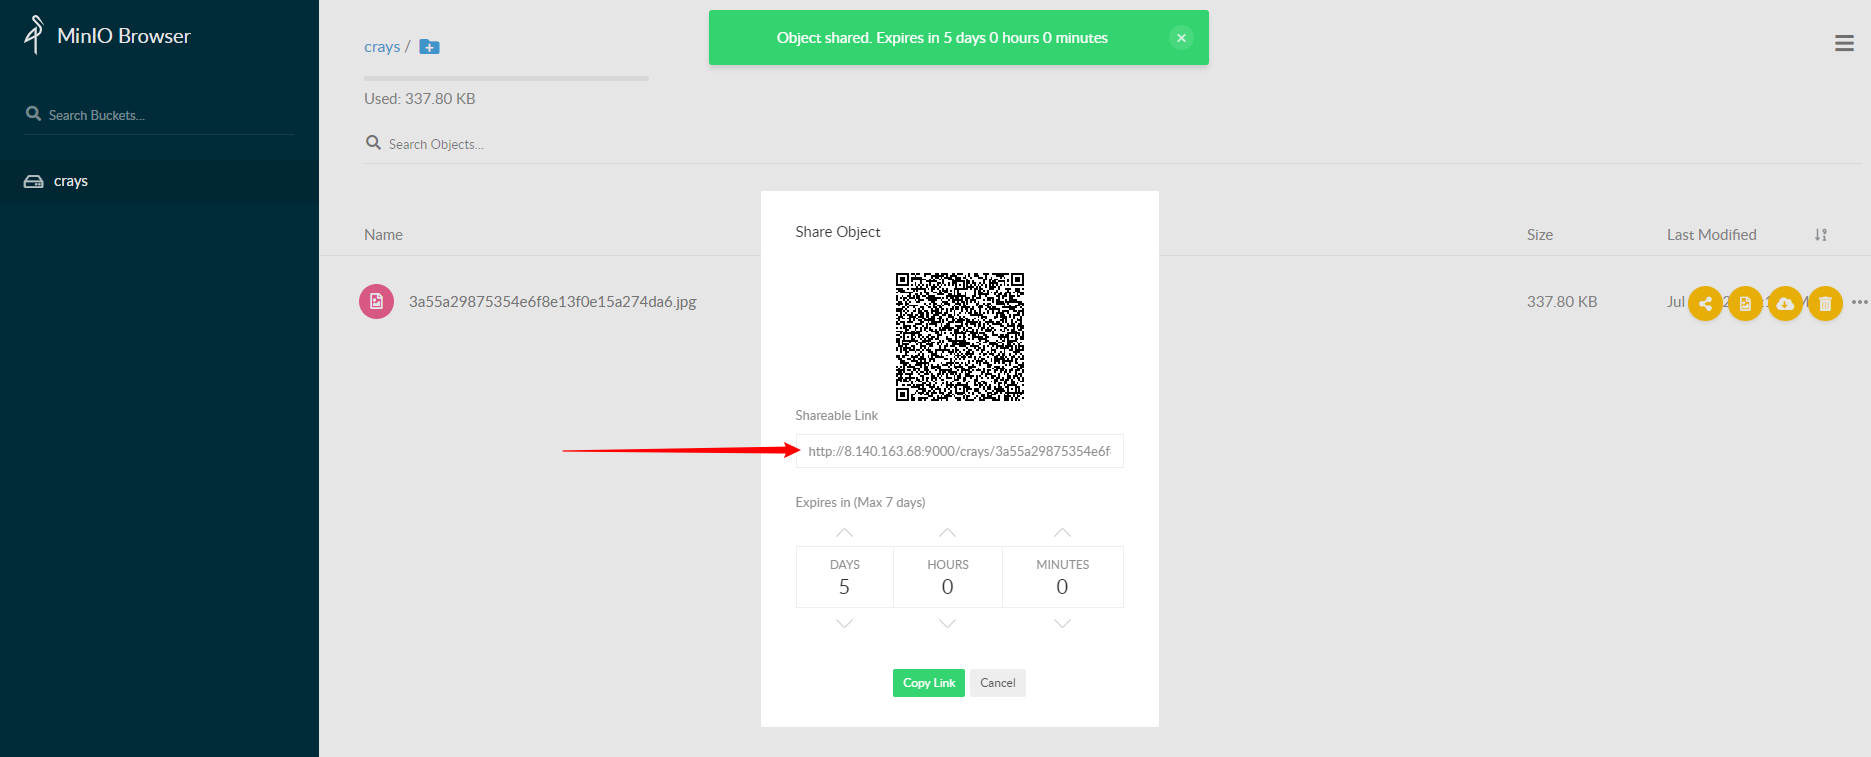
# 2.6 访问文件
点击刚才上传文件的右侧的点号,选择[Share],弹出分享框,会生成一个有日期有效天数限制的链接,使用该链接就可以访问该文件了。
# 3. MinIO Client 命令行工具
MinIO Client (mc) 是 MinIO 提供的命令行工具,用于访问 MinIO Server。它的命令设计的非常棒,和我们在使用 ls、cat、cp、mirror、diff、find 等 Unix 命令基本接近,主要如下:
ls       列出文件和文件夹
mb       创建一个存储桶或一个文件夹
cat      显示文件和对象内容
pipe     将一个 STDIN 重定向到一个对象或者文件或者 STDOUT
share    生成用于共享的 URL
cp       拷贝文件和对象
mirror   给存储桶和文件夹做镜像
find     基于参数查找文件
diff     对两个文件夹或者存储桶比较差异
rm       删除文件和对象
events   管理对象通知
watch    监听文件和对象的事件
policy   管理访问策略
session  为 cp 命令管理保存的会话
config   管理 mc 配置文件
update   检查软件更新
version  输出版本信息
2
3
4
5
6
7
8
9
10
11
12
13
14
15
16
17
例如说,使用 mc ls 列出有哪些 Bucket 存储桶:

考虑到你对 MinIO Client 可能不是很感兴趣,艿艿就暂时不过多啰嗦。感兴趣的话,可以看看如下文档:
- MinIO Client 安装:https://min.io/download
- MinIO Client 命令:https://docs.min.io/minio/baremetal/reference/minio-mc.html
# 4. Spring Boot 集成实战
接下来,我们来新建一个 Spring Boot 项目 minio-upload ,实现文件的上传与删除的功能。
# 4.1 引入依赖
在 pom.xml 文件中,引入 MinIO 相关依赖。
<?xml version="1.0" encoding="UTF-8"?>
<project xmlns="http://maven.apache.org/POM/4.0.0"
         xmlns:xsi="http://www.w3.org/2001/XMLSchema-instance"
         xsi:schemaLocation="http://maven.apache.org/POM/4.0.0 http://maven.apache.org/xsd/maven-4.0.0.xsd">
    <parent>
        <groupId>org.springframework.boot</groupId>
        <artifactId>spring-boot-starter-parent</artifactId>
        <version>2.6.9</version>
        <relativePath/> <!-- lookup parent from repository -->
    </parent>
    <modelVersion>4.0.0</modelVersion>

    <artifactId>lab-72-minio</artifactId>

    <dependencies>
        <!-- 实现对 Spring MVC 的自动化配置 -->
        <dependency>
            <groupId>org.springframework.boot</groupId>
            <artifactId>spring-boot-starter-web</artifactId>
        </dependency>

        <!-- MinIO 客户端 -->
        <dependency>
            <groupId>io.minio</groupId>
            <artifactId>minio</artifactId>
            <version>8.2.2</version>
        </dependency>
    </dependencies>

</project>
2
3
4
5
6
7
8
9
10
11
12
13
14
15
16
17
18
19
20
21
22
23
24
25
26
27
28
29
30
注意,如果引入的 Minio 的版本过高,例如说 8.3.7,会报依赖的冲突:
2022-03-19 11:29:59.954 ERROR 77692 --- [           main] o.s.b.d.LoggingFailureAnalysisReporter   :

***************************
APPLICATION FAILED TO START
***************************

Description:

An attempt was made to call a method that does not exist. The attempt was made from the following location:

    io.minio.S3Base.<clinit>(S3Base.java:98)

The following method did not exist:

    okhttp3.RequestBody.create([BLokhttp3/MediaType;)Lokhttp3/RequestBody;

The calling method's class, io.minio.S3Base, was loaded from the following location:

    jar:file:/Users/yunai/.m2/repository/io/minio/minio/8.3.7/minio-8.3.7.jar!/io/minio/S3Base.class

The called method's class, okhttp3.RequestBody, is available from the following locations:

    jar:file:/Users/yunai/.m2/repository/com/squareup/okhttp3/okhttp/3.14.9/okhttp-3.14.9.jar!/okhttp3/RequestBody.class

The called method's class hierarchy was loaded from the following locations:

    okhttp3.RequestBody: file:/Users/yunai/.m2/repository/com/squareup/okhttp3/okhttp/3.14.9/okhttp-3.14.9.jar


Action:

Correct the classpath of your application so that it contains compatible versions of the classes io.minio.S3Base and okhttp3.RequestBody
2
3
4
5
6
7
8
9
10
11
12
13
14
15
16
17
18
19
20
21
22
23
24
25
26
27
28
29
30
31
32
# 4.2 yaml 配置文件
application.yml文件内容如下:
spring:
  servlet:
    multipart:
      max-file-size: 10MB
      max-request-size: 10MB
#minio配置
  minio:
    access-key: AKIAIOSFODNN7EXAMPLE      #key就是docker初始化是设置的,密钥相同
    secret-key: wJalrXUtnFEMI/K7MDENG/bPxRfiCYEXAMPLEKEY
    url: http://localhost:9000
    bucket-name: wdhcr
  thymeleaf:
    cache: false
2
3
4
5
6
7
8
9
10
11
12
13
# 4.3 MinIOConfiguration 配置类
新建 MinIOConfiguration 配置类,创建 MinioClient Bean。代码如下:
package com.wdhcr.minioupload.config;

import io.minio.MinioClient;
import org.springframework.context.annotation.*;

@Configuration
@ConfigurationProperties(prefix = "spring.minio")
public class MinIOConfiguration {
    private String accessKey;

    private String secretKey;

    private String url;

    private String bucketName;

    @Bean
    public MinioClient minioClient() {
        // 创建 MinioClient 客户端
        return MinioClient.builder()
                .endpoint(url)
                .credentials(accessKey, secretKey)
                .build();
    }

}
2
3
4
5
6
7
8
9
10
11
12
13
14
15
16
17
18
19
20
21
22
23
24
25
26
使用配置属性绑定进行参数绑定,并初始化一个minio client对象放入容器中。
# 4.4 MinioComp 组件
这个就是我封装的minio client 操作minio的简单方法的组件。
package com.wdhcr.minioupload.component;

import com.wdhcr.minioupload.config.MinioConfiguration;
import io.minio.GetPresignedObjectUrlArgs;
import io.minio.MinioClient;
import io.minio.PostPolicy;
import io.minio.PutObjectArgs;
import io.minio.errors.*;
import io.minio.http.Method;
import org.springframework.beans.factory.annotation.Autowired;
import org.springframework.stereotype.Component;
import org.springframework.web.multipart.MultipartFile;

import java.io.IOException;
import java.io.InputStream;
import java.security.InvalidKeyException;
import java.security.NoSuchAlgorithmException;
import java.time.ZonedDateTime;
import java.util.HashMap;
import java.util.Map;
import java.util.concurrent.TimeUnit;

@Component
public class MinioComp {

    @Autowired
    private MinioClient minioClient;

    @Autowired
    private MinioConfiguration configuration;

    /**
     * 获取上传临时签名
     *
     * @param fileName 文件名
     * @param time
     * @return
     */
    public Map getPolicy(String fileName, ZonedDateTime time) {
        PostPolicy postPolicy = new PostPolicy(configuration.getBucketName(), time);
        postPolicy.addEqualsCondition("key", fileName);
        try {
            Map<String, String> map = minioClient.getPresignedPostFormData(postPolicy);
            HashMap<String, String> map1 = new HashMap<>();
            map.forEach((k, v) -> {
                map1.put(k.replaceAll("-", ""), v);
            });
            map1.put("host", configuration.getUrl() + "/" + configuration.getBucketName());
            return map1;
        } catch (ErrorResponseException e) {
            e.printStackTrace();
        } catch (InsufficientDataException e) {
            e.printStackTrace();
        } catch (InternalException e) {
            e.printStackTrace();
        } catch (InvalidKeyException e) {
            e.printStackTrace();
        } catch (InvalidResponseException e) {
            e.printStackTrace();
        } catch (IOException e) {
            e.printStackTrace();
        } catch (NoSuchAlgorithmException e) {
            e.printStackTrace();
        } catch (ServerException e) {
            e.printStackTrace();
        } catch (XmlParserException e) {
            e.printStackTrace();
        }
        return null;
    }

    /**
     * 获取上传文件的url
     *
     * @param objectName
     * @param method
     * @param time
     * @param timeUnit
     * @return
     */
    public String getPolicyUrl(String objectName, Method method, int time, TimeUnit timeUnit) {
        try {
            return minioClient.getPresignedObjectUrl(GetPresignedObjectUrlArgs.builder()
                    .method(method)
                    .bucket(configuration.getBucketName())
                    .object(objectName)
                    .expiry(time, timeUnit).build());
        } catch (ErrorResponseException e) {
            e.printStackTrace();
        } catch (InsufficientDataException e) {
            e.printStackTrace();
        } catch (InternalException e) {
            e.printStackTrace();
        } catch (InvalidKeyException e) {
            e.printStackTrace();
        } catch (InvalidResponseException e) {
            e.printStackTrace();
        } catch (IOException e) {
            e.printStackTrace();
        } catch (NoSuchAlgorithmException e) {
            e.printStackTrace();
        } catch (XmlParserException e) {
            e.printStackTrace();
        } catch (ServerException e) {
            e.printStackTrace();
        }
        return null;
    }

    /**
     * 上传文件
     *
     * @param file
     * @param fileName
     */
    public void upload(MultipartFile file, String fileName) {
        // 使用putObject上传一个文件到存储桶中。
        try {
            InputStream inputStream = file.getInputStream();
            minioClient.putObject(PutObjectArgs.builder()
                    .bucket(configuration.getBucketName())
                    .object(fileName)
                    .stream(inputStream, file.getSize(), -1)
                    .contentType(file.getContentType())
                    .build());
        } catch (ErrorResponseException e) {
            e.printStackTrace();
        } catch (InsufficientDataException e) {
            e.printStackTrace();
        } catch (InternalException e) {
            e.printStackTrace();
        } catch (InvalidKeyException e) {
            e.printStackTrace();
        } catch (InvalidResponseException e) {
            e.printStackTrace();
        } catch (IOException e) {
            e.printStackTrace();
        } catch (NoSuchAlgorithmException e) {
            e.printStackTrace();
        } catch (ServerException e) {
            e.printStackTrace();
        } catch (XmlParserException e) {
            e.printStackTrace();
        }
    }

    /**
     * 根据fileName获取文件访问地址
     *
     * @param objectName 文件名称
     * @param time
     * @param timeUnit
     * @return
     */
    public String getUrl(String objectName, int time, TimeUnit timeUnit) {
        String url = null;
        try {
            url = minioClient.getPresignedObjectUrl(GetPresignedObjectUrlArgs.builder()
                    .method(Method.GET)
                    .bucket(configuration.getBucketName())
                    .object(objectName)
                    .expiry(time, timeUnit).build());
        } catch (ErrorResponseException e) {
            e.printStackTrace();
        } catch (InsufficientDataException e) {
            e.printStackTrace();
        } catch (InternalException e) {
            e.printStackTrace();
        } catch (InvalidKeyException e) {
            e.printStackTrace();
        } catch (InvalidResponseException e) {
            e.printStackTrace();
        } catch (IOException e) {
            e.printStackTrace();
        } catch (NoSuchAlgorithmException e) {
            e.printStackTrace();
        } catch (XmlParserException e) {
            e.printStackTrace();
        } catch (ServerException e) {
            e.printStackTrace();
        }
        return url;
    }

    /**
     * 根据fileName来删除文件
     *
     * @param objectName 文件名称
     * @return
     */
    public void remove(String objectName) {
        try {
            minioClient.removeObject(RemoveObjectArgs.builder()
                    .bucket(configuration.getBucketName())
                    .object(objectName)
                    .build());
        } catch (ErrorResponseException e) {
            e.printStackTrace();
        } catch (InsufficientDataException e) {
            e.printStackTrace();
        } catch (InternalException e) {
            e.printStackTrace();
        } catch (InvalidKeyException e) {
            e.printStackTrace();
        } catch (InvalidResponseException e) {
            e.printStackTrace();
        } catch (IOException e) {
            e.printStackTrace();
        } catch (NoSuchAlgorithmException e) {
            e.printStackTrace();
        } catch (ServerException e) {
            e.printStackTrace();
        } catch (XmlParserException e) {
            e.printStackTrace();
        }
    }

}
2
3
4
5
6
7
8
9
10
11
12
13
14
15
16
17
18
19
20
21
22
23
24
25
26
27
28
29
30
31
32
33
34
35
36
37
38
39
40
41
42
43
44
45
46
47
48
49
50
51
52
53
54
55
56
57
58
59
60
61
62
63
64
65
66
67
68
69
70
71
72
73
74
75
76
77
78
79
80
81
82
83
84
85
86
87
88
89
90
91
92
93
94
95
96
97
98
99
100
101
102
103
104
105
106
107
108
109
110
111
112
113
114
115
116
117
118
119
120
121
122
123
124
125
126
127
128
129
130
131
132
133
134
135
136
137
138
139
140
141
142
143
144
145
146
147
148
149
150
151
152
153
154
155
156
157
158
159
160
161
162
163
164
165
166
167
168
169
170
171
172
173
174
175
176
177
178
179
180
181
182
183
184
185
186
187
188
189
190
191
192
193
194
195
196
197
198
199
200
201
202
203
204
205
206
207
208
209
210
211
212
213
214
215
216
217
218
简单说明:
- 使用MultipartFile接收前端文件流,再上传到minio。
- 构建一个formData的签名数据,给前端,让前端之前上传到minio。
- 构建一个可以上传的临时URL给前端,前端通过携带文件请求该URL进行上传。
- 使用filename请求服务端获取临时访问文件的URL。(最长时间为7 天,想要永久性访问,需要其他设置,这里不做说明。)
# 4.5 UploadController
新建 UploadController 类,实现文件上传、删除、获取文件Url等等的 RESTful API 接口。代码如下:
package com.wdhcr.minioupload.controller;

import com.wdhcr.minioupload.component.MinioComp;
import com.wdhcr.minioupload.domain.R;
import io.minio.http.Method;
import org.springframework.beans.factory.annotation.Autowired;
import org.springframework.web.bind.annotation.*;
import org.springframework.web.multipart.MultipartFile;

import java.time.ZonedDateTime;
import java.util.Map;
import java.util.concurrent.TimeUnit;

@RestController
public class UploadController {

    @Autowired
    private MinioComp minioComp;

    /**
     * 上传文件
     *
     * @param file     文件
     * @param fileName 文件名
     * @return
     */
    @PostMapping("/upload")
    public R upload(@RequestParam("file") MultipartFile file, @RequestParam("fileName") String fileName) {
        minioComp.upload(file, fileName);
        //文件上传成功后,返回一个可访问的URL
        String url = minioComp.getUrl(fileName, 7, TimeUnit.DAYS);
        return R.success(url);
    }

    /**
     * 前端formData直传
     *
     * @param fileName
     * @return
     */
    @GetMapping("/policy")
    public R policy(@RequestParam("fileName") String fileName) {
        Map policy = minioComp.getPolicy(fileName, ZonedDateTime.now().plusMinutes(10));
        return R.success(policy);
    }

    /**
     * 前端Url直传
     *
     * @param fileName
     * @return
     */
    @GetMapping("/uploadUrl")
    public R uploadUrl(@RequestParam("fileName") String fileName) {
        String url = minioComp.getPolicyUrl(fileName, Method.PUT, 2, TimeUnit.MINUTES);
        return R.success(url);
    }

    /**
     * 获取文件访问地址
     *
     * @param fileName 文件名
     * @return
     */
    @GetMapping("/url")
    public R getUrl(@RequestParam("fileName") String fileName) {
        String url = minioComp.getUrl(fileName, 7, TimeUnit.DAYS);
        return R.success(url);
    }

    /**
     * 删除文件
     *
     * @param fileName 文件名
     * @return
     */
    @DeleteMapping("/delete")
    public R delete(@RequestParam("fileName") String fileName) {
        minioComp.remove(fileName);
        return R.success();
    }

}
2
3
4
5
6
7
8
9
10
11
12
13
14
15
16
17
18
19
20
21
22
23
24
25
26
27
28
29
30
31
32
33
34
35
36
37
38
39
40
41
42
43
44
45
46
47
48
49
50
51
52
53
54
55
56
57
58
59
60
61
62
63
64
65
66
67
68
69
70
71
72
73
74
75
76
77
78
79
80
81
82
83
为了给前端返回的统一数据响应格式,我这里封装一个响应结果类,代码如下:
package com.wdhcr.minioupload.domain;

import lombok.Data;

import java.io.Serializable;

@Data
public class R implements Serializable {

    private int code;

    private String message;

    private Object data;

    private R() {
    }

    private R(int code, String message, Object data) {
        this.code = code;
        this.message = message;
        this.data = data;
    }

    public static R success() {
        return success("操作成功");
    }


    public static R success(String message, Object data) {
        return new R(200, message, data);
    }

    public static R success(Object data) {
        return new R(200, "操作成功", data);
    }

    public static R error() {
        return new R(500, "操作失败", null);
    }

    public static R error(String message) {
        return new R(500, message, null);
    }
}
2
3
4
5
6
7
8
9
10
11
12
13
14
15
16
17
18
19
20
21
22
23
24
25
26
27
28
29
30
31
32
33
34
35
36
37
38
39
40
41
42
43
44
45
# 4.6 Application启动类
新建 MinioUploadApplication 启动类。代码如下:
package com.wdhcr.minioupload;

import org.springframework.boot.SpringApplication;
import org.springframework.boot.autoconfigure.SpringBootApplication;

@SpringBootApplication
public class MinioUploadApplication {

    public static void main(String[] args) {
        SpringApplication.run(MinioUploadApplication.class, args);
    }

}
2
3
4
5
6
7
8
9
10
11
12
13
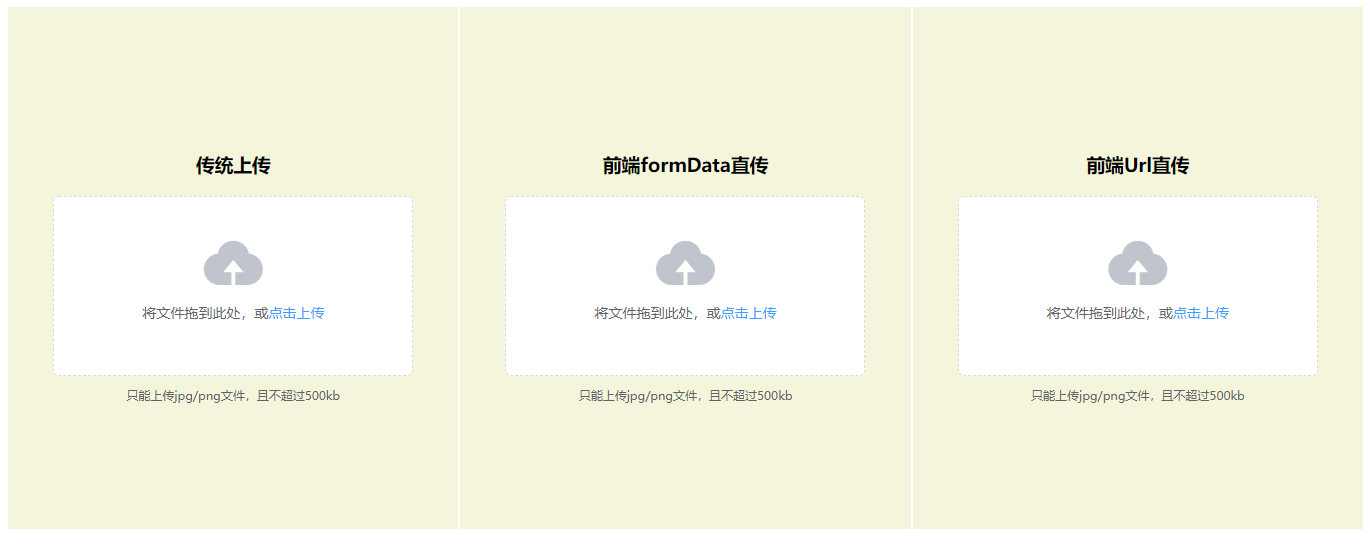
# 4.7 前端页面
下面展示页面html,使用的是VUE+element-ui进行渲染。
<!DOCTYPE html>
<html>
<head>
    <meta charset="UTF-8">
    <!-- import CSS -->
    <link rel="stylesheet" href="https://unpkg.com/element-ui@2.15.9/lib/theme-chalk/index.css">
    <title>上传图片</title>
</head>
<body>
<div id="app">

    <el-row :gutter="2">
        <el-col :span="8">
            <div class="div-center-class">
                <div class="">
                    <center><h3>传统上传</h3></center>
                    <el-upload
                            class="upload-demo"
                            action="#"
                            drag
                            :http-request="uploadHandle">
                        <i class="el-icon-upload"></i>
                        <div class="el-upload__text">将文件拖到此处,或<em>点击上传</em></div>
                        <div class="el-upload__tip" slot="tip">只能上传jpg/png文件,且不超过500kb</div>
                    </el-upload>
                    <div v-if="imgUrl">
                        <img :src="imgUrl" style="width: 40px;height: 40px"></img>
                    </div>
                </div>
            </div>
        </el-col>
        <el-col :span="8">
            <div class="div-center-class">
                <div class="">
                    <center><h3>前端formData直传</h3></center>
                    <el-upload
                            class="upload-demo"
                            action="#"
                            drag
                            :http-request="httpRequestHandle">
                        <i class="el-icon-upload"></i>
                        <div class="el-upload__text">将文件拖到此处,或<em>点击上传</em></div>
                        <div class="el-upload__tip" slot="tip">只能上传jpg/png文件,且不超过500kb</div>
                    </el-upload>
                    <div v-if="directUrl">
                        <img :src="directUrl" style="width: 40px;height: 40px"></img>
                    </div>
                </div>
            </div>
        </el-col>
        <el-col :span="8">
            <div class="div-center-class">
                <div class="">
                    <center><h3>前端Url直传</h3></center>
                    <el-upload
                            class="upload-demo"
                            action="#"
                            drag
                            :http-request="UrlUploadHandle">
                        <i class="el-icon-upload"></i>
                        <div class="el-upload__text">将文件拖到此处,或<em>点击上传</em></div>
                        <div class="el-upload__tip" slot="tip">只能上传jpg/png文件,且不超过500kb</div>
                    </el-upload>
                    <div v-if="uploadUrl">
                        <img :src="uploadUrl" style="width: 40px;height: 40px"></img>
                    </div>
                </div>
            </div>
        </el-col>
    </el-row>
</div>
</body>
<!-- import Vue before Element -->
<script src="https://unpkg.com/vue@2.5.21/dist/vue.js"></script>
<!-- import JavaScript -->
<script src="https://unpkg.com/element-ui@2.15.9/lib/index.js"></script>
<!--import  axios -->
<script src="https://unpkg.com/axios@0.24.0/dist/axios.min.js"></script>
<script>
    new Vue({
        el: '#app',
        data: function () {
            return {
                imgUrl: '',
                directUrl: '',
                uploadUrl:''
            }
        },
        methods: {

            uploadHandle(options) {
                let {file} = options;
                this.traditionPost(file);
            },
            traditionPost(file) {
                _that = this
                const form = new FormData();
                form.append("fileName", file.name);
                form.append("file", file);
                this.axiosPost("post", "/upload", form).then(function (res) {
                    if (res.status === 200) {
                        _that.imgUrl = res.data.data
                    } else {
                        alert("上传失败!")
                    }
                })
            },
            getpolicy(file) {
                _that = this
                axios.get('policy?fileName=' + file.name)
                    .then(function (response) {
                        let {xamzalgorithm, xamzcredential, policy, xamzsignature, xamzdate, host} = response.data.data;
                        let formData = new FormData();
                        formData.append("key", file.name);
                        formData.append("x-amz-algorithm", xamzalgorithm);  // 让服务端返回200,不设置则默认返回204。
                        formData.append("x-amz-credential", xamzcredential);
                        formData.append("policy", policy);
                        formData.append("x-amz-signature", xamzsignature);
                        formData.append("x-amz-date", xamzdate);
                        formData.append("file", file);
                        // 发送 POST 请求
                        _that.axiosPost("post", host, formData).then(function (res) {
                            if (res.status === 204) {
                                axios.get('url?fileName=' + file.name).then(function (res) {
                                    _that.directUrl = res.data.data;
                                })
                            } else {
                                alert("上传失败!")
                            }
                        })
                    })
            },
            httpRequestHandle(options) {
                let {file} = options;
                this.getpolicy(file);
            },

            UrlUploadHandle(options) {
                let {file} = options;
                this.getUploadUrl(file);
            },
            getUploadUrl(file) {
                _that = this
                console.log(file)
                axios.get('uploadUrl?fileName=' + file.name)
                    .then(function (response) {
                        let url = response.data.data;
                        // 发送 put 请求
                        let config = {'Content-Type':file.type}
                        _that.axiosPost("put", url, file,config).then(function (res) {
                            if (res.status === 200) {
                                axios.get('url?fileName=' + file.name).then(function (res) {
                                    _that.uploadUrl = res.data.data;
                                })
                            } else {
                                alert("上传失败!")
                            }
                        })
                    })
            },
            //封装
            //axios封装post请求
            axiosPost(method, url, data,config) {
                let result = axios({
                    method: method,
                    url: url,
                    data: data,
                    headers:config
                }).then(resp => {
                    return resp
                }).catch(error => {
                    return "exception=" + error;
                });
                return result;
            }

        }
    })
</script>
<style>
    .div-center-class {
        padding: 28% 0%;
        text-align: center;
        background: beige;
    }
</style>
</html>
2
3
4
5
6
7
8
9
10
11
12
13
14
15
16
17
18
19
20
21
22
23
24
25
26
27
28
29
30
31
32
33
34
35
36
37
38
39
40
41
42
43
44
45
46
47
48
49
50
51
52
53
54
55
56
57
58
59
60
61
62
63
64
65
66
67
68
69
70
71
72
73
74
75
76
77
78
79
80
81
82
83
84
85
86
87
88
89
90
91
92
93
94
95
96
97
98
99
100
101
102
103
104
105
106
107
108
109
110
111
112
113
114
115
116
117
118
119
120
121
122
123
124
125
126
127
128
129
130
131
132
133
134
135
136
137
138
139
140
141
142
143
144
145
146
147
148
149
150
151
152
153
154
155
156
157
158
159
160
161
162
163
164
165
166
167
168
169
170
171
172
173
174
175
176
177
178
179
180
181
182
183
184
185
186
187
# 4.8 启动项目查看效果
① 执行 MinioUploadApplication 启动 Spring Boot 项目。
② 浏览器访问地址 http://localhost:8081/ 来查看页面效果,如下图所示。
上传成功后,我们获得了文件的访问 URL 地址,并在页面上展示出来,如下图。
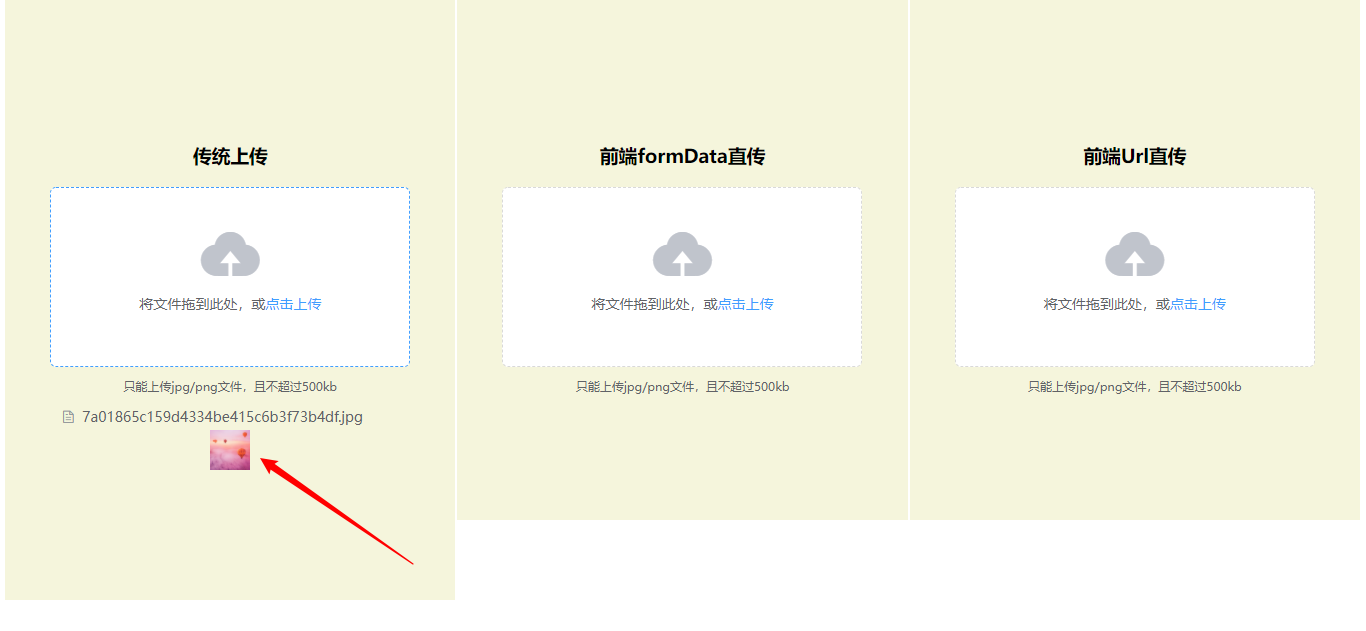
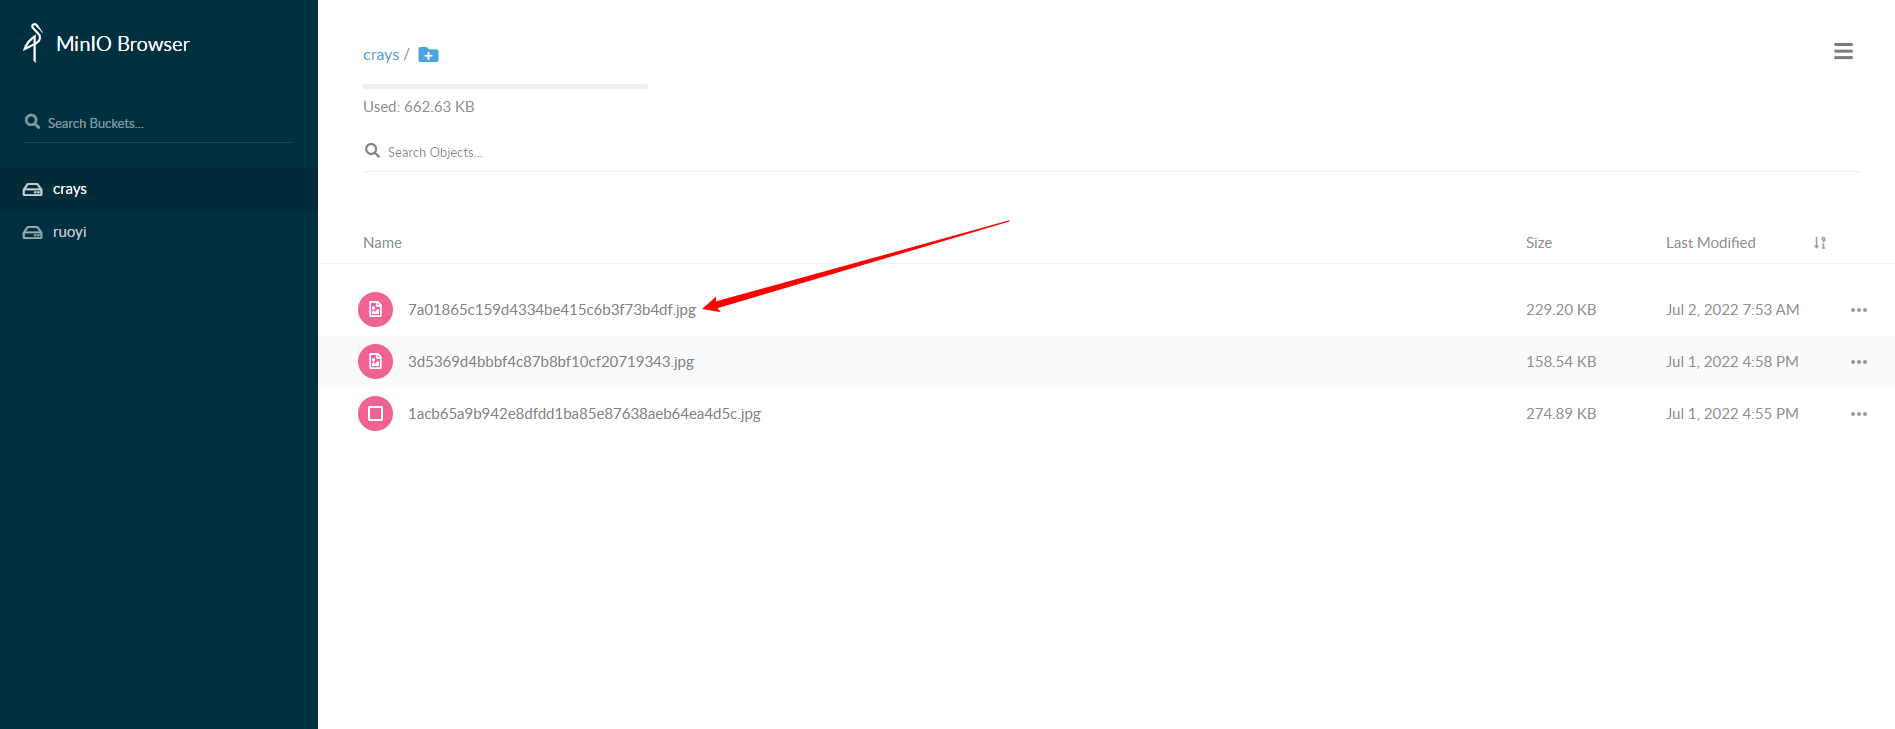
同时在 MinIO 后台界面,也可以查询到该文件。
③ 使用 Postman 调用 /delete 接口,进行文件的删除测试,我并没有在页面上实现删除功能,大家自行测试吧。
好了,以上就是使用Spring Boot搭建基于MinIO的高性能存储服务的全部步骤了。如果需要项目全部代码,可以去下面这个地址自行下载。
https://github.com/zhengxiaochuan/java-learning/tree/main/minio-upload